Returns & Refunds

Do you have a lot to store but your space is too small?
If yes, your best solution is to go for floating wall shelves. These shelves are a wallet-friendly and creative way to create more storage space in your house regardless of the size of the rooms. Additionally, you do not need to hire an expert to make the floating shelves for you since this is an easy DIY task.
As long as you have the right tools, materials, and procedures for making the shelves, you can create a great piece and save the costs of hiring somebody to help you.
Read the rest of this article to get more information on how to install floating shelves without hiring a professional.
Gathering the right supplies and tools is the first step towards having a successful DIY floating wall shelves project. Learning how to install floating shelves is exciting. You’ll end up with shelves that perfectly complement your kitchen, living room and home office to fit the items you wish to store at home.
The tools and materials that you need to gather for this project are:
Carefully following the step-by-step guide on how to make floating shelves helps you to have the perfect results. This project takes approximately half a day to complete. This varies based on the number and size of shelves that you desire to build.
Additionally, you should allocate enough drying time after completion before you start using the DIY shelves.
Here are the steps to follow on how to install wall shelves and DIY floating shelves.
Determine precisely where on the wall you expect to build the floating wall shelves and mark the position. Use the tape measure to measure the length on the wall based on the size of shelves you want to build. You can also mark using a masking tape or string line. Additionally, mark the distance that you will have between the shelves if you intend to have more than one shelf.
When buying the board or wood that you want to use for the shelves, you should buy one size bigger than the shelves you’ll build.
Thereafter, you will cut the board to fit on the space you marked on the wall, and this will be the size of your shelves.
An ideal length to cut the board for a moderately-sized shelf is 25”.
Repeat the process if you are making more than one shelf until you get the number of shelves you intend to build.
Use the hand router and create a notch that will allow the hardware to fit at the back of each shelf. Ideally, the notch should be at least ½” deep. However, this varies based on the piece of wood or board that you use. These notches are necessary because they will prevent creating a gap between the shelf and the wall after hanging the shelf.
Using a hand drill, create holes that are about 4” deep. These holes give the hardware a space to slide into place. The size of the gap may differ based on the instructions on your hardware. If you find it hard to create straight holes using a hand drill, you can start with a paddle bit and then drill using a drill press.
When deciding how to style wall shelves, make sure to choose a color that complements the wall and door where you will place the shelves.
This is one of the most significant advantages of building the shelves yourself since you get a more customized look that you may miss if you buy the shelves from a store.
Whether you stain or paint the shelves, allow enough time for them to dry completely before you continue working on them.
After the shelves are ready and dry, you can get to the next step of hanging shelves on the wall.
This is the most delicate step of the project. This step determines how safe the shelves are and how they will look. Again, follow the hardware’s instructions. Place the shelves on the marks you had initially made on where to hang them.
After the hardware is in place, slip the shelves through the drilling holes into place.
How do floating shelves hang? Use a level to help make sure each floating shelf is straight on the wall. The DIY shelves are now ready for use.
DIY floating shelves help you create more storage space in a small or narrow room.
Additionally, these shelves do not require exceptional experience for one to come up with perfect wall shelves for your kitchen, living room, or bedroom.
Use the steps above on how to build floating shelves and make your next successful home DIY project.
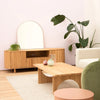
RJ Living also offers a range of beautifully designed wall shelves and decor to set up a perfect place for hanging clothes, display books, plants, or kitchenware.


Sale 15% OFF


Sale 15% OFF


Sale 15% OFF


Sale 15% OFF


Sale 15% OFF


Sale 15% OFF


Sale 15% OFF


Sale 15% OFF


Sale 15% OFF


Sale 15% OFF